> ## Documentation Index
> Fetch the complete documentation index at: https://docs.newly.app/llms.txt
> Use this file to discover all available pages before exploring further.
# OneSignal Integration
> Add push notifications to your app with OneSignal
# OneSignal Integration
OneSignal lets you add push notifications to your Newly app. Connect with one click and the AI sets up the SDK, notification components, and a preferences screen for you. Supports both **iOS** and **Android**.
## What is OneSignal?
OneSignal is a push notification platform that handles delivery, user segmentation, engagement tracking, and rich notifications (images, buttons, deep links).
## Setting Up OneSignal
Find the Push Notifications panel in the tool strip.
Newly creates a OneSignal app and links it to your project automatically. No OneSignal account needed.
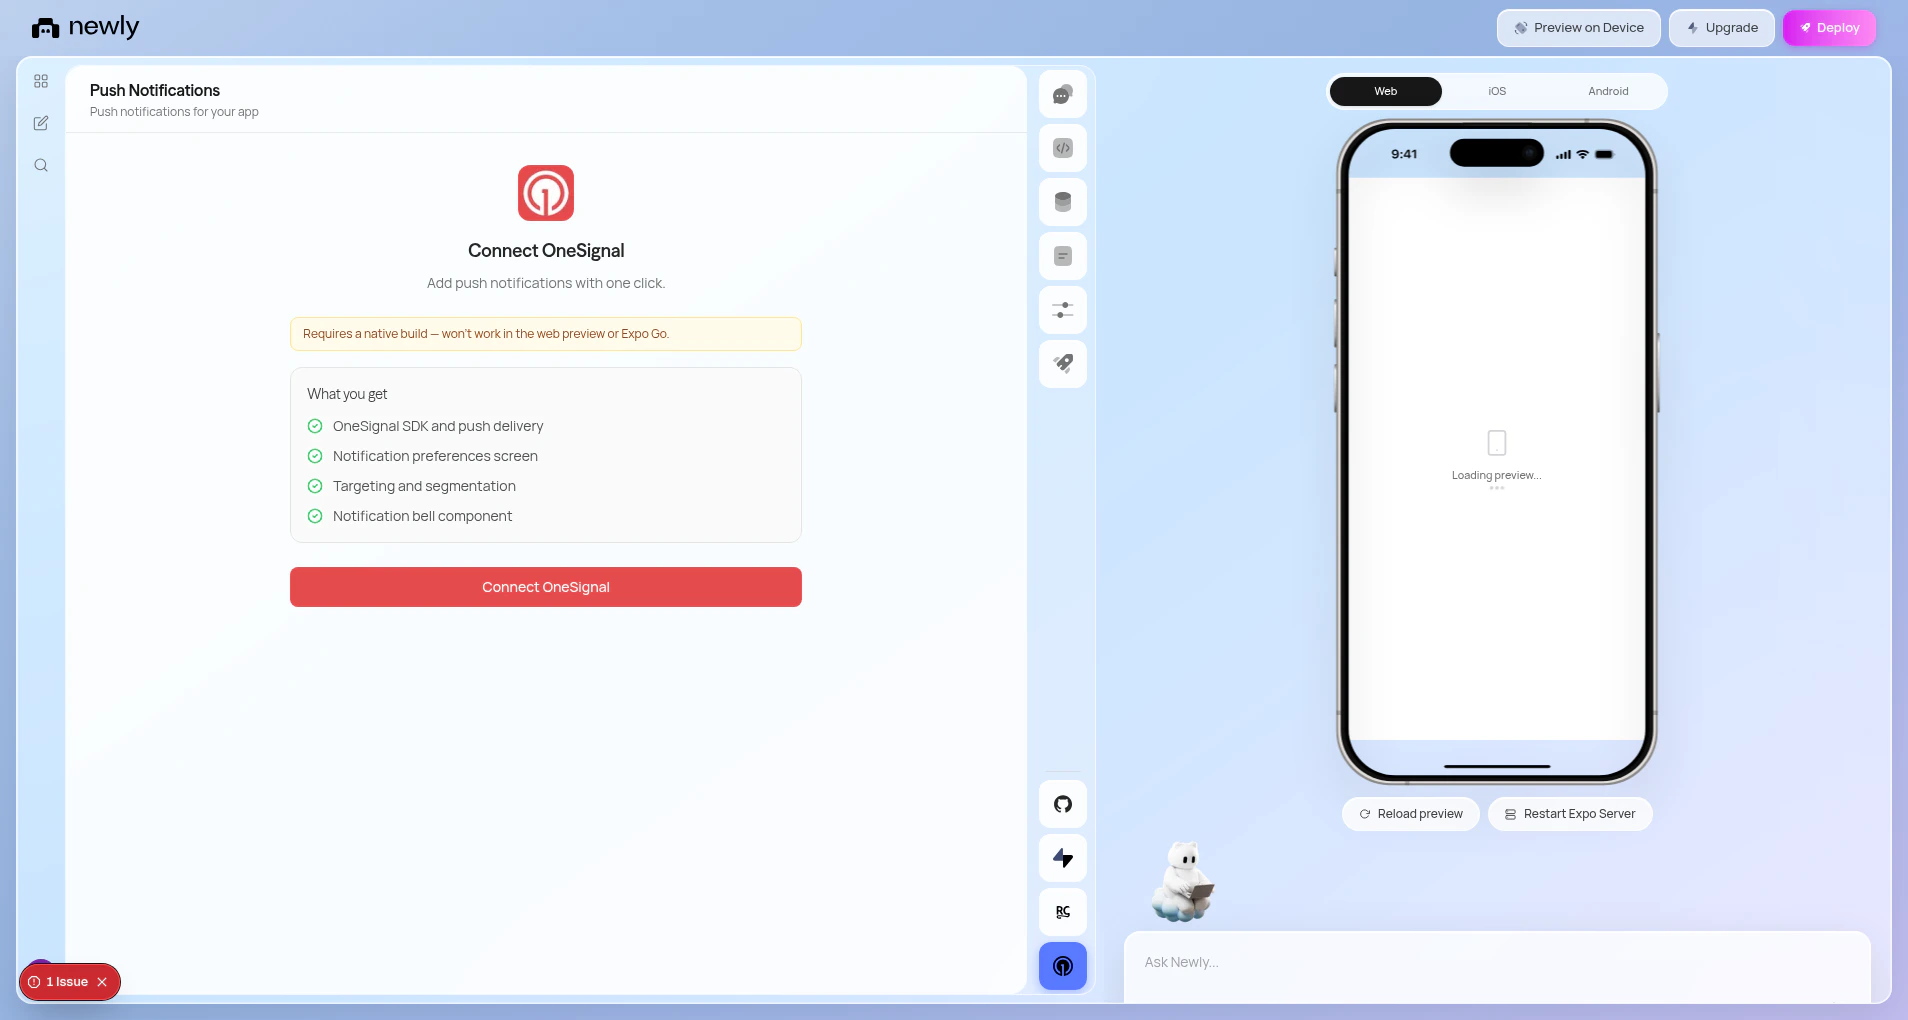 Set up credentials for the platforms you want to support:
* **iOS**: If you've added Apple credentials in Newly, press **Sync Apple credentials to OneSignal** to configure APNs for iOS push delivery.
* **Android**: Upload your Firebase service account JSON and `google-services.json` in the Push Notifications panel to enable FCM for Android push delivery. See [Android Configuration](#android-configuration) for details.
The AI will:
* Add `NotificationProvider` to your app layout
* Add a `NotificationBell` component to your home screen
* Create a notification preferences screen
* Configure your bundle identifier
Create a native build and press **Send test notification** to verify everything works.
Push notifications only work in native builds. They will **not** work in the web preview or Expo Go.
## What Gets Added to Your App
When you connect OneSignal and run the AI setup, three components are added:
| Component | Purpose |
| ---------------------------- | ------------------------------------------------------------------------------------ |
| **NotificationProvider** | Wraps your app layout, initializes the OneSignal SDK, and handles permission prompts |
| **NotificationBell** | A bell icon for your home screen that shows unread notification count |
| **Notification Preferences** | A screen where users can manage their notification settings |
## Sending Notifications
After setup, you can send notifications by asking the AI to set them up in your app logic. Newly manages the OneSignal connection for you.
Ask the AI to trigger notifications based on events in your app:
```
When a user completes a purchase, send them a
push notification thanking them for their order.
```
Target specific user groups:
```
Add a notification that targets users who haven't
opened the app in 7 days with a re-engagement message.
```
Use the **Send test notification** button in the Push Notifications panel to verify your setup is working.
## Common Patterns
```
Send a welcome push notification when a new user
signs up for the first time.
```
```
Notify users when someone comments on their post
or follows their profile.
```
```
Set up a notification for a limited-time discount
that deep links to the offers screen.
```
## iOS Configuration
iOS requires APNs (Apple Push Notification service) credentials to deliver notifications. You'll need to set up your Apple credentials in Newly first.
Open the **Apple Credentials** panel in Newly. You can either:
* **Automatic** (recommended): Sign in with your Apple ID and Newly handles the rest
* **Manual**: Upload your own `.p8` APNs key file from the Apple Developer Portal
In the Push Notifications panel, press **Sync Apple credentials to OneSignal**. This sends your APNs credentials to OneSignal so it can deliver to iOS devices.
The panel will show **APNs credentials detected** when synced successfully.
## Android Configuration
Android requires Firebase Cloud Messaging (FCM) credentials to deliver notifications. You'll need a Firebase project linked to your app.
Go to the [Firebase Console](https://console.firebase.google.com) and create a project (or use an existing one). Add an Android app with your app's package name.
You need two files from Firebase:
* **Service account JSON**: Go to **Project Settings → Service accounts → Generate new private key**. This file lets OneSignal send notifications via FCM.
* **google-services.json**: Go to **Project Settings → General → Your apps → Download google-services.json**. This file configures your Android app to receive notifications.
In the Push Notifications panel, find the **Android (FCM)** section and upload both files.
Press **Sync credentials to OneSignal** to send your FCM credentials to OneSignal for Android push delivery.
The panel will show your **Firebase project ID** when configured successfully.
## Testing Notifications
1. Create a **development build** of your app (not Expo Go)
2. Install on a physical device or simulator
3. Accept the push notification permission prompt
4. Go back to the Push Notifications panel in Newly
5. Press **Send test notification**
If the test notification doesn't arrive, make sure your platform credentials are synced (APNs for iOS, FCM for Android) and that the app has notification permissions enabled on the device.
## Best Practices
Only send notifications users care about. Too many and they'll uninstall.
Use segments and user data to send relevant messages
Let users control which notifications they receive
Schedule notifications for when users are most likely to engage
## Troubleshooting
* Make sure you're testing on a **native build**, not Expo Go or web preview
* Check that the device has notification permissions enabled
* **iOS**: Verify APNs credentials are synced in the Push Notifications panel
* **Android**: Verify FCM credentials are uploaded and synced
* Add your Apple credentials in the Apple Credentials panel first
* Then press **Sync Apple credentials to OneSignal** in the Push Notifications panel
* If it still fails, double check your APNs Auth Key, Key ID, and Team ID
* Make sure you uploaded both the **service account JSON** and **google-services.json**
* Re-download fresh files from the Firebase Console if in doubt
* Ensure the Firebase project has Cloud Messaging API enabled
* Make sure the app was opened at least once after installing the native build
* Check that the user accepted the notification permission prompt
* **iOS**: Ensure APNs credentials are synced
* **Android**: Ensure FCM credentials are uploaded and synced
* Try uninstalling and reinstalling the app, then send again
* Check your internet connection
* Try refreshing the page and connecting again
* If it keeps failing, disconnect and reconnect OneSignal
Bundle ID changes need two steps. Saving the new bundle ID in Apple Credentials updates your project and `app.json`, but it doesn't automatically push the new value to OneSignal's APNs config. To finish the update:
1. **More → Push Notifications**, then click **Configure platforms**. This pushes the current bundle ID to OneSignal's APNs platform config.
Alternatively, you can **Disconnect** OneSignal and **Connect** it again – reconnecting calls Configure platforms automatically.
See the full walkthrough in [Changing your bundle ID](/guides/bundle-id-changes).
## Resources
Official OneSignal documentation
Best practices for push notifications
## Next Steps
Deploy your app with push notifications
Add in-app purchases and subscriptions
Set up credentials for the platforms you want to support:
* **iOS**: If you've added Apple credentials in Newly, press **Sync Apple credentials to OneSignal** to configure APNs for iOS push delivery.
* **Android**: Upload your Firebase service account JSON and `google-services.json` in the Push Notifications panel to enable FCM for Android push delivery. See [Android Configuration](#android-configuration) for details.
The AI will:
* Add `NotificationProvider` to your app layout
* Add a `NotificationBell` component to your home screen
* Create a notification preferences screen
* Configure your bundle identifier
Create a native build and press **Send test notification** to verify everything works.
Push notifications only work in native builds. They will **not** work in the web preview or Expo Go.
## What Gets Added to Your App
When you connect OneSignal and run the AI setup, three components are added:
| Component | Purpose |
| ---------------------------- | ------------------------------------------------------------------------------------ |
| **NotificationProvider** | Wraps your app layout, initializes the OneSignal SDK, and handles permission prompts |
| **NotificationBell** | A bell icon for your home screen that shows unread notification count |
| **Notification Preferences** | A screen where users can manage their notification settings |
## Sending Notifications
After setup, you can send notifications by asking the AI to set them up in your app logic. Newly manages the OneSignal connection for you.
Ask the AI to trigger notifications based on events in your app:
```
When a user completes a purchase, send them a
push notification thanking them for their order.
```
Target specific user groups:
```
Add a notification that targets users who haven't
opened the app in 7 days with a re-engagement message.
```
Use the **Send test notification** button in the Push Notifications panel to verify your setup is working.
## Common Patterns
```
Send a welcome push notification when a new user
signs up for the first time.
```
```
Notify users when someone comments on their post
or follows their profile.
```
```
Set up a notification for a limited-time discount
that deep links to the offers screen.
```
## iOS Configuration
iOS requires APNs (Apple Push Notification service) credentials to deliver notifications. You'll need to set up your Apple credentials in Newly first.
Open the **Apple Credentials** panel in Newly. You can either:
* **Automatic** (recommended): Sign in with your Apple ID and Newly handles the rest
* **Manual**: Upload your own `.p8` APNs key file from the Apple Developer Portal
In the Push Notifications panel, press **Sync Apple credentials to OneSignal**. This sends your APNs credentials to OneSignal so it can deliver to iOS devices.
The panel will show **APNs credentials detected** when synced successfully.
## Android Configuration
Android requires Firebase Cloud Messaging (FCM) credentials to deliver notifications. You'll need a Firebase project linked to your app.
Go to the [Firebase Console](https://console.firebase.google.com) and create a project (or use an existing one). Add an Android app with your app's package name.
You need two files from Firebase:
* **Service account JSON**: Go to **Project Settings → Service accounts → Generate new private key**. This file lets OneSignal send notifications via FCM.
* **google-services.json**: Go to **Project Settings → General → Your apps → Download google-services.json**. This file configures your Android app to receive notifications.
In the Push Notifications panel, find the **Android (FCM)** section and upload both files.
Press **Sync credentials to OneSignal** to send your FCM credentials to OneSignal for Android push delivery.
The panel will show your **Firebase project ID** when configured successfully.
## Testing Notifications
1. Create a **development build** of your app (not Expo Go)
2. Install on a physical device or simulator
3. Accept the push notification permission prompt
4. Go back to the Push Notifications panel in Newly
5. Press **Send test notification**
If the test notification doesn't arrive, make sure your platform credentials are synced (APNs for iOS, FCM for Android) and that the app has notification permissions enabled on the device.
## Best Practices
Only send notifications users care about. Too many and they'll uninstall.
Use segments and user data to send relevant messages
Let users control which notifications they receive
Schedule notifications for when users are most likely to engage
## Troubleshooting
* Make sure you're testing on a **native build**, not Expo Go or web preview
* Check that the device has notification permissions enabled
* **iOS**: Verify APNs credentials are synced in the Push Notifications panel
* **Android**: Verify FCM credentials are uploaded and synced
* Add your Apple credentials in the Apple Credentials panel first
* Then press **Sync Apple credentials to OneSignal** in the Push Notifications panel
* If it still fails, double check your APNs Auth Key, Key ID, and Team ID
* Make sure you uploaded both the **service account JSON** and **google-services.json**
* Re-download fresh files from the Firebase Console if in doubt
* Ensure the Firebase project has Cloud Messaging API enabled
* Make sure the app was opened at least once after installing the native build
* Check that the user accepted the notification permission prompt
* **iOS**: Ensure APNs credentials are synced
* **Android**: Ensure FCM credentials are uploaded and synced
* Try uninstalling and reinstalling the app, then send again
* Check your internet connection
* Try refreshing the page and connecting again
* If it keeps failing, disconnect and reconnect OneSignal
Bundle ID changes need two steps. Saving the new bundle ID in Apple Credentials updates your project and `app.json`, but it doesn't automatically push the new value to OneSignal's APNs config. To finish the update:
1. **More → Push Notifications**, then click **Configure platforms**. This pushes the current bundle ID to OneSignal's APNs platform config.
Alternatively, you can **Disconnect** OneSignal and **Connect** it again – reconnecting calls Configure platforms automatically.
See the full walkthrough in [Changing your bundle ID](/guides/bundle-id-changes).
## Resources
Official OneSignal documentation
Best practices for push notifications
## Next Steps
Deploy your app with push notifications
Add in-app purchases and subscriptions